Overview/General
Things you will need in addition to your Planter Well Reservoir for installation:
1-1/4" PVC Fill Tube (Provided by Hooks and Lattice/Planters Unlimited with purchase of reservoir.)
Gravel (Optional for additional drainage) and filter fabric (Optional)
PVC Adhesive (Available at any local hardware store.)
PVC Cutter (Optional If you would like to cut down the height of your PVC Fill Tube)
Light weight, fibrous soil
Plants
Step One:
Place layer of gravel in the bottom of decorative planter for additional drainage (Optional). To prevent soil from entering gravel area place filter fabric cloth over gravel. It is not necessary to use filter fabric but can be helpful if you do have drainage holes.

Step Two:
Place the Planter Well Reservoir into bottom of decorative planter over gravel. *Please note: The desired distance between the reservoir and the root ball of your plants should be between 2" and 10". The water in the reservoir will travel and average of 12" upwardly and 9" around. You want to be sure that your plant root zone is within the 12" zone of the reservoir otherwise it will not get enough water. If you have a large planter you will need to back fill underneath the reservoir to lift the reservoir up nearer to your root system if you are planting smaller plants.
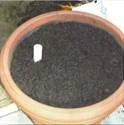
Step Three:
Place a small amount of PVC adhesive to the outside of the PVC fill tube before inserting into the reservoir. Insert 1-1/4" fill tube into the Planter Well Reservoir. The adhesive will help secure the fill tube in the reservoir in the event that someone tries to pull up on the fill tube.
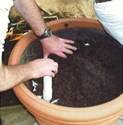
Step Four:
Place light weight, fibrous soil into planter to desired level. Tap it down but please do not pack it down.

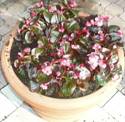
Step Five:
Place plants into planter and add the rest of the soil around plants. Add water into fill tube until Planter Well Reservoir is full. The soil, once the water is added, will immediately draw the water up out of the reservoir. Just for the first watering, water soil thoroughly.
*Please note: If you are planting a window box, after you have filled the reservoir, wait for a time to see how moist the soil becomes. You may not need to top water because the soil has taken up a sufficient amount of water.

Step Six:
Replenish water in tank as required to maintain desired moisture level.
*Please note: We recommend the use of a dip stick to measure water levels. Dipsticks can be purchased at your local hardware store.
*Watering times may vary depending on the environment. The reservoirs usually need to be refilled every 1-2 weeks. In some cases the reservoirs may need more frequent watering if you are in an extremely hot, arid climate and less frequent if you are in a moist damp, cooler climate. Remember that even if the reservoir is empty, the soil can still be very moist. Be careful not to over water.